
Full Stack Application – HTMX + ExpressJS + Turso: A Step-by-Step Guide 🎉 📚
Welcome to a step-by-step guide to building full-stack application using three technologies – HTMX, Express.js and Turso. In this tutorial, I'll show you how to build a simple application using this popular backend framework, together with HTMX.

In this tutorial, we will use three technologies to build a Grocery List web application. HTMX, which allows us to add real-time updates and interactivity without diving deep into complex JavaScript. On the backend side, we will use Express, a Node.js framework, that handles server-side logic and API endpoints seamlessly. We will be using Turso, as the database, but you can use any database you want.
htmx gives you access to AJAX, CSS Transitions, WebSockets and Server Sent Events directly in HTML, using attributes, so you can build modern user interfaces with the simplicity and power of hypertext - Source: https://htmx.org/
The final application will look like this:
Grocery list application – final
Setting up project
1.1. Create a Project Directory:
Set up a dedicated folder for your full-stack application project. This is where you'll organize your files and code.
1.2. Install HTMX, Express, and Turso:
Using pnpm (or any other package manager), install necessary packages which will be the foundation of our full-stack application.
pnpm add express pug @libsql/client body-parser nodemonLet's look at some of them:
express: Express.js is a fast and minimalist web application framework for Node.js. It simplifies routing, middleware integration, and request handling.pug: Pug (formerly known as Jade) is a popular template engine for generating dynamic HTML content on the server-side.@libsql/client: This package appears to be related to SQL database connectivity and client-side operations.body-parser: Body-parser is middleware for Express.js that simplifies parsing and handling request body data, such as JSON or form data.nodemon: Nodemon is a development tool that monitors changes in your source code and automatically restarts the server when files are modified, making the development workflow more efficient.
Next add the startup script in package.json file in the script section:
"start": "nodemon index.js"
1.3. Adding Server Startup in index.js file:
Now that you've installed necessary packages, it's time to start your Express.js server. Here's how to add server startup in your index.js (or app.js) file:
- Begin by requiring Express and other dependencies you've installed.
const express = require("express");
const bodyParser = require("body-parser");
1.4. Create an Express App:
- Initialize your Express application by invoking the
express()function.
const app = express();
1.5. Configure Middleware:
- Set up middlewares required for your application.
app.use(express.json());
app.use(bodyParser.json({ limit: "50mb" }));
app.use(bodyParser.urlencoded({ limit: "50mb", extended: true }));
1.6. Define a Port Number:
- Specify the port on which your server will listen. You can use an environment variable or a hard-coded value.
const PORT = process.env.PORT || 3000;1.7. Start the Server:
- Finally, use the
app.listen()method to start your Express server and make it listen on the defined port.
app.listen(PORT, () => {
	console.log(
		`======= App listening on port ${PORT}! =======`
	);
});
Save your index.js file and run it using a previously created start-up script in your terminal:
pnpm run start
You should see a message indicating that the server is running on the specified port.
Data Management with Turso
2.1 Configuring Turso in Your Express Application with @libsql/client
If you decide to use Turso, please follow the installation steps described on their website:


In this step, we'll configure Turso with @libsql/client for database interactions. Here's how to do it:
- In the root of your application, create folder named
db - Inside of it create
config.jsfile - Require
@libsql/clientand create client instance assigned to the variable. Provide the appropriate database connection details, such as the database URL:
const { createClient } = require("@libsql/client");

const client = createClient({
	url: "<YOUR_DB_URL>",
	authToken: "<YOUR_DB_TOKEN>",
});

module.exports = client;- In your main application file (e.g.,
index.js), require database config:
const db = require("./db/config");Backend Development with Express
3.1. Define the Index route:
Now let's start creating routing for our CRUD operations. Define the index route by specifying the HTTP method as GET and the route path as / and retrieve all data from the Turso model:
app.get("/", async (_, res) => {
	try {
		const data = await db.execute("SELECT * FROM products");
		res.render("index", { products: data.rows });
	} catch (error) {
		console.error("Error fetching data:", error);
		res.status(500).json({ error: "An error occurred while fetching data." });
	}
});
Index route
Let's also explain this line:
res.render("index", { products: data.rows });
renderis a method provided by Express.js for rendering views or templates. In this case, it's used to render the “index” view."index"is the name of the view or template that you want to render. This typically corresponds to an HTML template file, often written in a templating language like EJS, Pug, Handlebars, etc.{ products: data.rows }is an object passed as the second argument tores.render. This object contains data that can be dynamically inserted into the “index” view during rendering.data.rowsrepresents the data itself. A database query returns the data inside therowsobject.
Before we move on, we need to add additional configuration to Express to handle PUG templates.
Add this lines into your index.js file:
const pug = require("pug");

app.set("view engine", "pug");
By setting the view engine to pug you're telling Express to recognize .pug files as your view templates. This means that when you use the res.render() method to render a view in your routes, Express will automatically look for a corresponding Pug template file and use it to generate the HTML response sent to the client's web browser.
Frontend Development with HTMX
3.2. Create the views folder:
- Inside your project directory, create a new folder and name it
views. This folder will store all your Pug view templates.
YourProject/
├── views/
└── ...
Project structure showing views folder place
3.3. Create the index.pug file:
- Inside the newly created
viewsfolder, create a new file namedindex.pug
YourProject/
├── views/
│   └── index.pug
└── ...
Project structure showing index.pug file inside views folder
3.4. Define the HTMX structure in index.pug:
- Let's add a basic HTMX to the index file. Copy and paste the code below to
index.pugfile:
DOCTYPE(html)
html(lang='en')
    head
        meta(charset='UTF-8')
        meta(name="viewport" content="width=device-width, initial-scale=1.0")
        title Grocery List

        script(src="https://unpkg.com/hyperscript.org@0.9.11")
        script(src="https://unpkg.com/htmx.org@1.9.6")
    body
        nav(class="flex nav")
            h1(class="h1 mb-0") Grocery List

        table(class="table table-striped")
            thead
                tr
                    th(class="table-secondary") Product
                    th(class="table-secondary") Quantity
                    th(class="table-secondary") Unit
                    th(class="table-secondary")
                    th(class="table-secondary")
            tbody(id="products" hx-target="closest tr" hx-swap="outerHTML")
                each product in products
                    tr
                        td #{product.name}
                        td #{product.quantity}
                        td
                            span(class="badge bg-secondary") #{product.unit}
                        td
                            button(class="btn btn-primary" hx-get=`/edit-form/${product.id}`) EDIT
                        td
                            button(class="btn btn-danger" hx-delete=`/delete/${product.id}`) DELETE
Index.pug file
Let's break down the most important parts:
tbody(id="products" hx-target="closest tr" hx-swap="outerHTML"): The table body with anidofproductsis where the database items will be dynamically displayed.hx-target: This is an HTMX attribute that specifies the target element selector. It's often used to define which part of the DOM you want to interact with or modify when an event or action occurs."closest tr": This is the value assigned to thehx-targetattribute. It is a CSS selector that describes the desired target element. In this case, it's using the CSSclosestmethod to find the closest ancestor element that matches thetr(table row) selector.hx-swap: This is an HTMX attribute, used to specify how an element should be replaced or updated when certain events occur or when data changes."outerHTML": This is the value assigned to thehx-swapattribute. In this context, it indicates that the element's entire HTML, including the element itself and its content, should be replaced or updated.each product in products: This loop iterates through an array ofproductsand generates a table row for each one. The data for each product is interpolated into the table cells.
With this setup under http://localhost:3000, you've should see something similar to this:
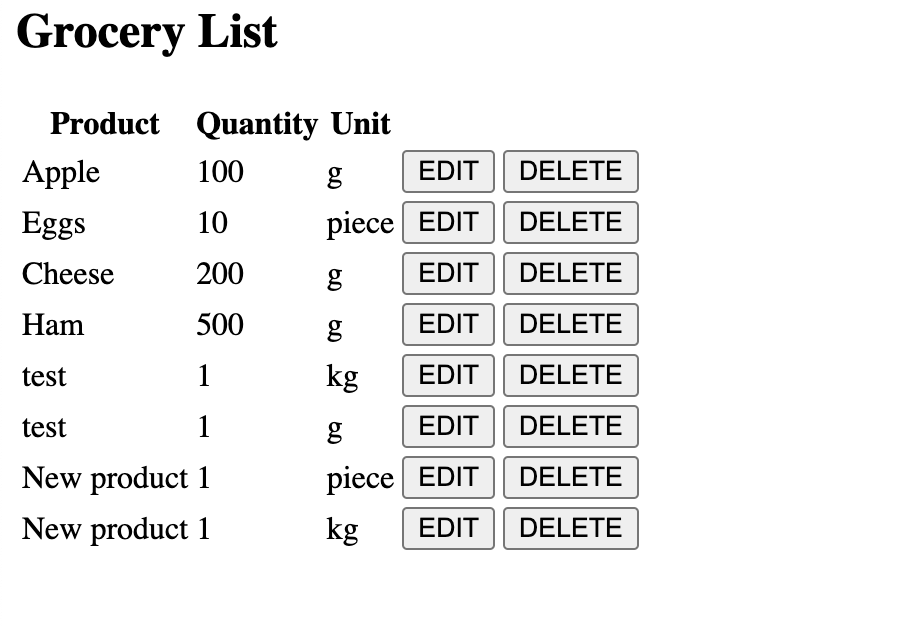
More CRUD operations:
4.1. Define the Submit Route:
Next, let's add a /submit route that will handle adding new product to database and return HTMX template:
app.post("/submit", async (req, res) => {
	const product = {
		id: crypto.randomUUID(),
		name: req.body.name,
		quantity: Number(req.body.quantity),
		unit: req.body.unit,
	};

	const template = pug.compileFile("views/includes/product.pug");

	try {
		await db.execute(
			`INSERT INTO products (id, name, quantity, unit) VALUES ("${product.id}", "${product.name}", "${product.quantity}", "${product.unit}");`
		);

		const markup = template({ product });
		res.send(markup);
	} catch (error) {
		console.log("ERROR", error);
	}
});
Submit new product route
Let's take a look closer on this line:
const template = pug.compileFile("views/includes/product.pug");
This line compiles a Pug template file located at views/includes/product.pug into a JavaScript function called template. The template will be used later to render HTML.
Also remember to add crypto library in the index.js file:
const crypto = require("crypto");
4.2. Define product.pug file
In the views directory, create a subfolder named includes. Inside this folder, add a new file named product.pug and then copy and paste the following code into it:
tr
    td #{product.name}
    td #{product.quantity}
    td
        span(class="badge bg-secondary") #{product.unit}
    td
        button(class="btn btn-primary" hx-get=`/edit-form/${product.id}`) EDIT
    td
        button(class="btn btn-danger" hx-delete=`/delete/${product.id}`) DELETE
product.pug file
4.3. Add product form:
To be able adding new product, we need a form. Update the index.pug file by the adding the following code below nav tag:
body
        nav(class="flex nav")
            h1(class="h1 mb-0") Grocery List

        div(class="container py-4 px-3 mx-auto")
            form(
                hx-post="/submit"
                hx-swap="beforeend"
                hx-target="#products"
                class="mb-3 needs-validation"
                _="on htmx:afterRequest target.reset()"
            )
                input(
                    placeholder="Product name"
                    type="text"
                    name="name"
                    id="name"
                    class="form-control mb-3"
                    hx-swap="this"
                    required
                )
                input(
                    placeholder="Product quantity"
                    type="number"
                    name="quantity"
                    id="quantity"
                    class="form-control mb-3"
                    required
                )

                select(name="unit" class="form-select mb-3" required)
                    option(selected) Choose unit
                    option(value="kg") kg
                    option(value="g") g
                    option(value="l") l
                    option(value="ml") ml
                    option(value="piece") piece


                button(type="submit" class="add-product btn btn-info") Add product

// ... rest of the form remains the same
Index.pug file with form
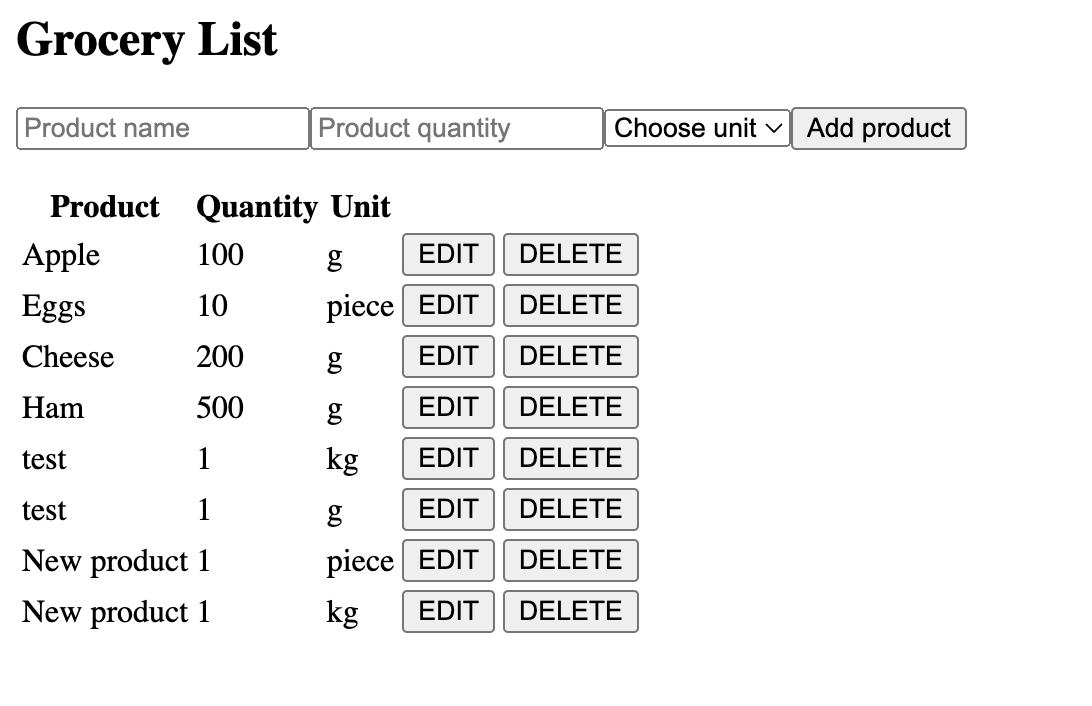
The line _="on htmx:afterRequest target.reset()" essentially means that after a HTMX request (such as a form submission) is successfully completed, the form that triggered the request will be reset, clearing any data entered by the user and preparing it for another submission.
Thanks to this, you should be able to add a new product to the list, which should immediately appear at the end of the table:
4.3. Delete route:
Next one will be a delete product route. In the index.js file, add the code below:
app.delete("/delete/:id", async (req, res) => {
	const id = req.params.id;

	try {
		await db.execute(`DELETE FROM products WHERE id=("${id}");`);
		res.send("");
	} catch (error) {
		console.log("ERROR", error);
	}
});
Delete product route
res.send("");means if the deletion operation is successful, an empty response is sent back to the client. This indicates that the item with the specified “id” has been deleted from the database.
4.4. Edit route:
Before we start adding the edit route, let's take a look how the editing will be work.
- Once the user selects the row for editing, create an editable form that is initially populated with the current data from the selected row.
- Pre-fill the form fields with the existing values, allowing the user to see the current information they intend to modify.
- Display two buttons – one for canceling editing (CANCEL) and one for saving changes (SAVE)
First off, create the route that will handle replacing the table row by product ID with the editable form:
app.get("/edit-form/:id", async (req, res) => {
	const id = req.params.id;
	const template = pug.compileFile("views/includes/edit-product-form.pug");

	try {
		const productData = await db.execute(
			`SELECT * FROM products WHERE id=("${id}");`
		);

		const product = productData.rows[0];

		const markup = template({ product });
		res.send(markup);
	} catch (error) {
		console.log("ERROR", error);
	}
});
Edit form by id route
Then in the views folder, create includes subfolder where it will be placed all smaller templates part.
Next, create the edit-product-form.pug file and paste the code below:
tr
    td
        input(type="text" class="form-control" name="name" value=`${product.name}`)
    td
        input(type="number" class="form-control" name="quantity" value=`${product.quantity}`)
    td
        select(name="unit" class="form-select")
            option(selected) #{product.unit}
            option(value="kg") kg
            option(value="g") g
            option(value="l") l
            option(value="ml") ml
            option(value="piece") piece
    td
        button(type="button" class="btn btn-outline-warning" hx-get=`/product/${product.id}`) Cancel
    td
        button(type="button" hx-confirm="Are you sure?" class="btn btn-success" hx-put=`/edit/${product.id}` hx-include="closest tr") Save
Edit form PUG file
Now when you click on the first button in the product row you should see how the row is to enter the editable state:
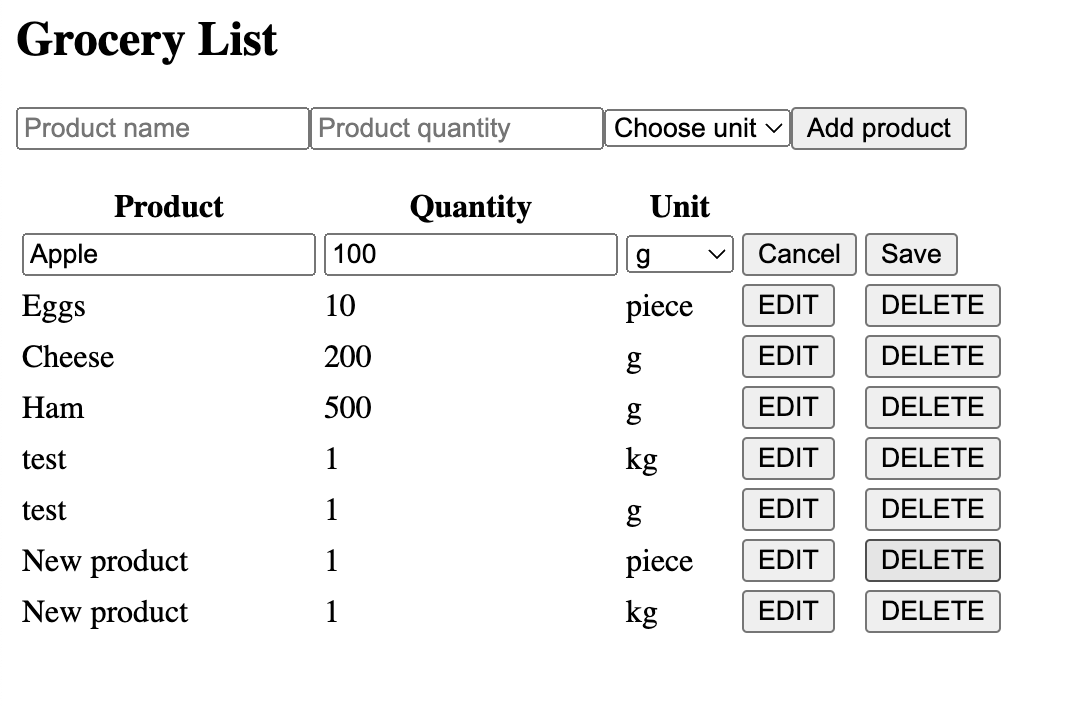
To enable full editing of a product in the database, we need to click the Save button. However, before proceeding with this action, it's essential to implement the logic for handling product edits through a separate route:
app.put("/edit/:id", async (req, res) => {
	const product = {
		id: req.params.id,
		name: req.body.name,
		quantity: req.body.quantity,
		unit: req.body.unit,
	};

	const template = pug.compileFile("views/includes/edit-product.pug");

	try {
		await db
			.execute(
				`UPDATE Products SET name=("${product.name}"), quantity=("${product.quantity}"), unit=("${product.unit}") WHERE id=("${product.id}");`
			)
			.then(() => {
				const markup = template({ product });
				res.send(markup);
			});
	} catch (error) {
		console.log("ERROR", error);
	}
});
Edit by id route
We also need the edit-product.pug file placed in views/includes a folder that will return the newly edited product:
tr
    td #{product.name}
    td #{product.quantity}
    td
        span(class="badge bg-secondary") #{product.unit}
    td
        button(class="btn btn-primary" hx-get=`/edit-form/${product.id}`) EDIT
    td
        button(class="btn btn-danger" hx-delete=`/delete/${product.id}`) DELETE
Edit product PUG file
4.5. Cancel route:
The user also has the option to cancel the product editing process. In this case, we should revert to displaying the previous table row with the original product data.
To accomplish this, we need to create a route that retrieves product data based on its unique identifier (ID). You can add the following code to your index.js file:
app.get("/product/:id", async (req, res) => {
	const id = req.params.id;
	const template = pug.compileFile("views/includes/product.pug");

	try {
		const productData = await db.execute(
			`SELECT * FROM products WHERE id=("${id}");`
		);

		const product = productData.rows[0];

		const markup = template({ product });
		res.send(markup);
	} catch (error) {
		console.log("ERROR", error);
	}
});
Edit by id route
We define an earlier product.pug file, so we will re-use it here and return as a template in the response.
Finishing and Styling application
Great! The application is complete with all its features.
Now that we've completed the logic of our application, we can focus on enhancing its visual appeal. For this tutorial, we'll be utilizing Bootstrap to polished application design.
To integrate Bootstrap into our application, follow these steps:
- Open the
index.pugfile in your project, and locate the<head>tag. - Within the
<head>tag, include the CDN scripts provided by Bootstrap. This will enable us to access Bootstrap's styling and components, making it easier to create a visually appealing user interface.

Furthermore, you have the option to incorporate Bootstrap icons using the same approach:
With these steps completed, your application should closely resemble the appearance depicted in the image provided at the beginning of this blog post. 👏
Source code
You can check out the fully completed Grocery List app along with the source code in this repository:
 KrzysztofLen
Thanks for reading ♥️♥️