
Building a Flutter application with a local ISAR database 📱
ISAR is a high-performance, fully async NoSQL, and schema first database for Flutter. Isar was started as a replacement for Hive. By incorporating ISAR into your Flutter project, you'll be able to manage and manipulate data with queries, multi-entry indexes and JSON support.
Setting up and configuration:
Add dependencies:
flutter pub add isar isar_flutter_libs path_provider
flutter pub add -d isar_generator build_runner
Let's take a look at those package's one by one:
isar: this is the main package that provides ISAR and its functionalitiesisar_flutter_libs: it might provide additional functionality or integration specifically for Flutterpath_provider: this is the popular Flutter package that's provide accessing the device file system and directoriesisar_generator: its code generator related to the ISAR packagebuild_runner: is a popular tool used for generating files using Dart code
Schema:
In ISAR database, data are stored as a collection. Collection is like an object and represents tables in compare to other databases solutions like SQL. A collection definition is called “schema”.
Define collection:
To define ISAR collection, you have to annotate class by @collection keyword.
Each collection contains fields that represent the specific attribute or property of the data that you want to store in the collection, and defines the type and constraints of that data.
Let's define a basic Contact collection:
import 'package:isar/isar.dart';

part 'contact.g.dart';

@collection
class Contact {
  Id id = Isar.autoIncrement; // you can also use id = null to auto increment

  late String firstName;

  late String lastName;

  late int age;
}
It is important to set an Id property which identifying an object for each collection.
Isar automatically indexes id fields, which allows you to get and modify objects based on their id efficiently. - Source: https://isar.dev/schema.html#anatomy-of-a-collection
Renaming:
By default, Isar uses the class name as the collection name, but it is the possibility to rename collections and fields by annotating it by @Name keyword:
import 'package:isar/isar.dart';

part 'contact.g.dart';

@collection
@Name('Contacts')
class Contact {
  Id id = Isar.autoIncrement; // you can also use id = null to auto increment

  @Name('name')
  late String firstName;

  late String lastName;

  late int age;
}
Enums:
ISAR support various of data types, all of them you can find here. Additionally, embedded objects and enums are supported, and we can use it like so:
enum ContactType {
  private('Private'),
  buisness('Buisness');

  const ContactType(this.type);

  final String type;
}
Update contact.dart file:
@collection
@Name('Contacts')
class Contact {
  // rest of the code remains the same

  @enumerated
  late ContactType contactType;
}
Embedded objects:
Embedded objects allows having nested objects by annotating them with @embedded keyword:
@embedded
class Address {
  String? street;

  String? postcode;
}
Update contact.dart file:
@collection
@Name('Contacts')
class Contact {
  // rest of the code remains the same

  late Address address;
}
Run code generator:
Now let's use the code generator to generate Dart code. Run the follow command in your terminal:
flutter pub run build_runner buildWith that, you've should see a generated file called contact.g.dart.
Isar database initialization:
To start working with the database, we need to create an ISAR instance class. We will create a service that will store all the code related to the configuration and operation on the database.
The basic IsarService will be looks like this:
import 'package:isar/isar.dart';
import 'package:path_provider/path_provider.dart';

class IsarService {
  late Future<Isar> db;

  IsarService() {
    db = openDB();
  }

  Future<Isar> openDB() async {
    if (Isar.instanceNames.isEmpty) {
      final dir = await getApplicationDocumentsDirectory();
      final isar = await Isar.open(
        [], // Here we will add a schema's
        directory: dir.path,
        inspector: true,
      );

      return isar;
    }

    return Future.value(Isar.getInstance());
  }
}
To connect our database with the earlier created schema, we need to pass it to the open() function as a first parameter, inside of parenthesis:
final isar = await Isar.open(
        [ContactSchema],
        directory: dir.path,
        inspector: true,
      );
The file ContactSchema comes from a generated file contact.g.dart. You can bypass as many schemas as you want.
Let's also explain what the two additional parameters means:
directory – is the storage location for this instance. We use ispath_providerpackage here to get valid location on all platforms.inspector – enable the Inspector for debug builds.
Isar CRUD (Create, Read, Update, Delete)
ISAR provides an easy way to manipulate collections with the CRUD operations.
Let's take a look at some of them:
CREATE – add new contact collection
 Future<void> addNewContact(Contact newContact) async {
    final isar = await db;

    isar.writeTxnSync<int>(() => isar.contacts.putSync(newContact));
  }
READ – get all contact collections:
 Future<List<Contact>> getContacts() async {
    final isar = await db;

    IsarCollection<Contact> contactsCollection = isar.collection<Contact>();
    final contacts = contactsCollection.where().findAll();
    return contacts;
  }
You can also get collection with such syntax witch use getter: IsarCollection<Contact> contacts = isar.contacts;
UPDATE – update contact collection:
Future<void> updateContact(int id, Contact updatedContact) async {
    final isar = await db;

    await isar.writeTxn(() async {
      final contactToUpdate = await isar.contacts.get(id);

      if (contactToUpdate != null) {
        await isar.contacts.put(updatedContact);
      } else {
        print('Contact with ID not found.');
      }
    });
  }
DELETE – delete contact collection:
Future<void> deleteContact(int id) async {
    final isar = await db;

    await isar.writeTxn(() async {
      final success = await isar.contacts.delete(id);
      print('Contact deleted: $success');
    });
  }
ISAR Database Inspector
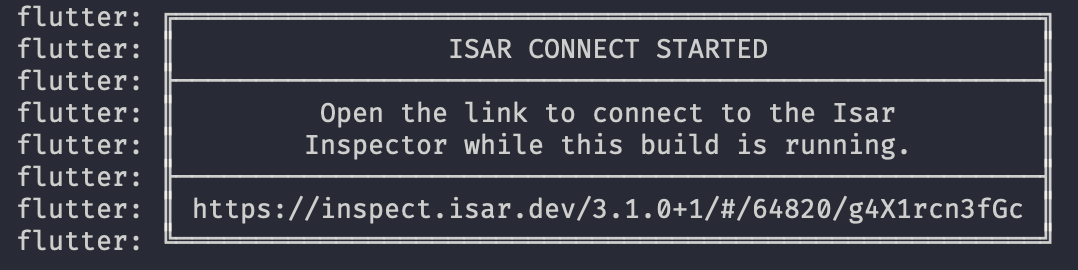
When you run the application in debug mode, you should see the generated ISAR inspector URL in the terminal. This:
Allows you to inspect the Isar instances & collections of your app in real-time - Source https://pub.dev/packages/isar#isar-database-inspector
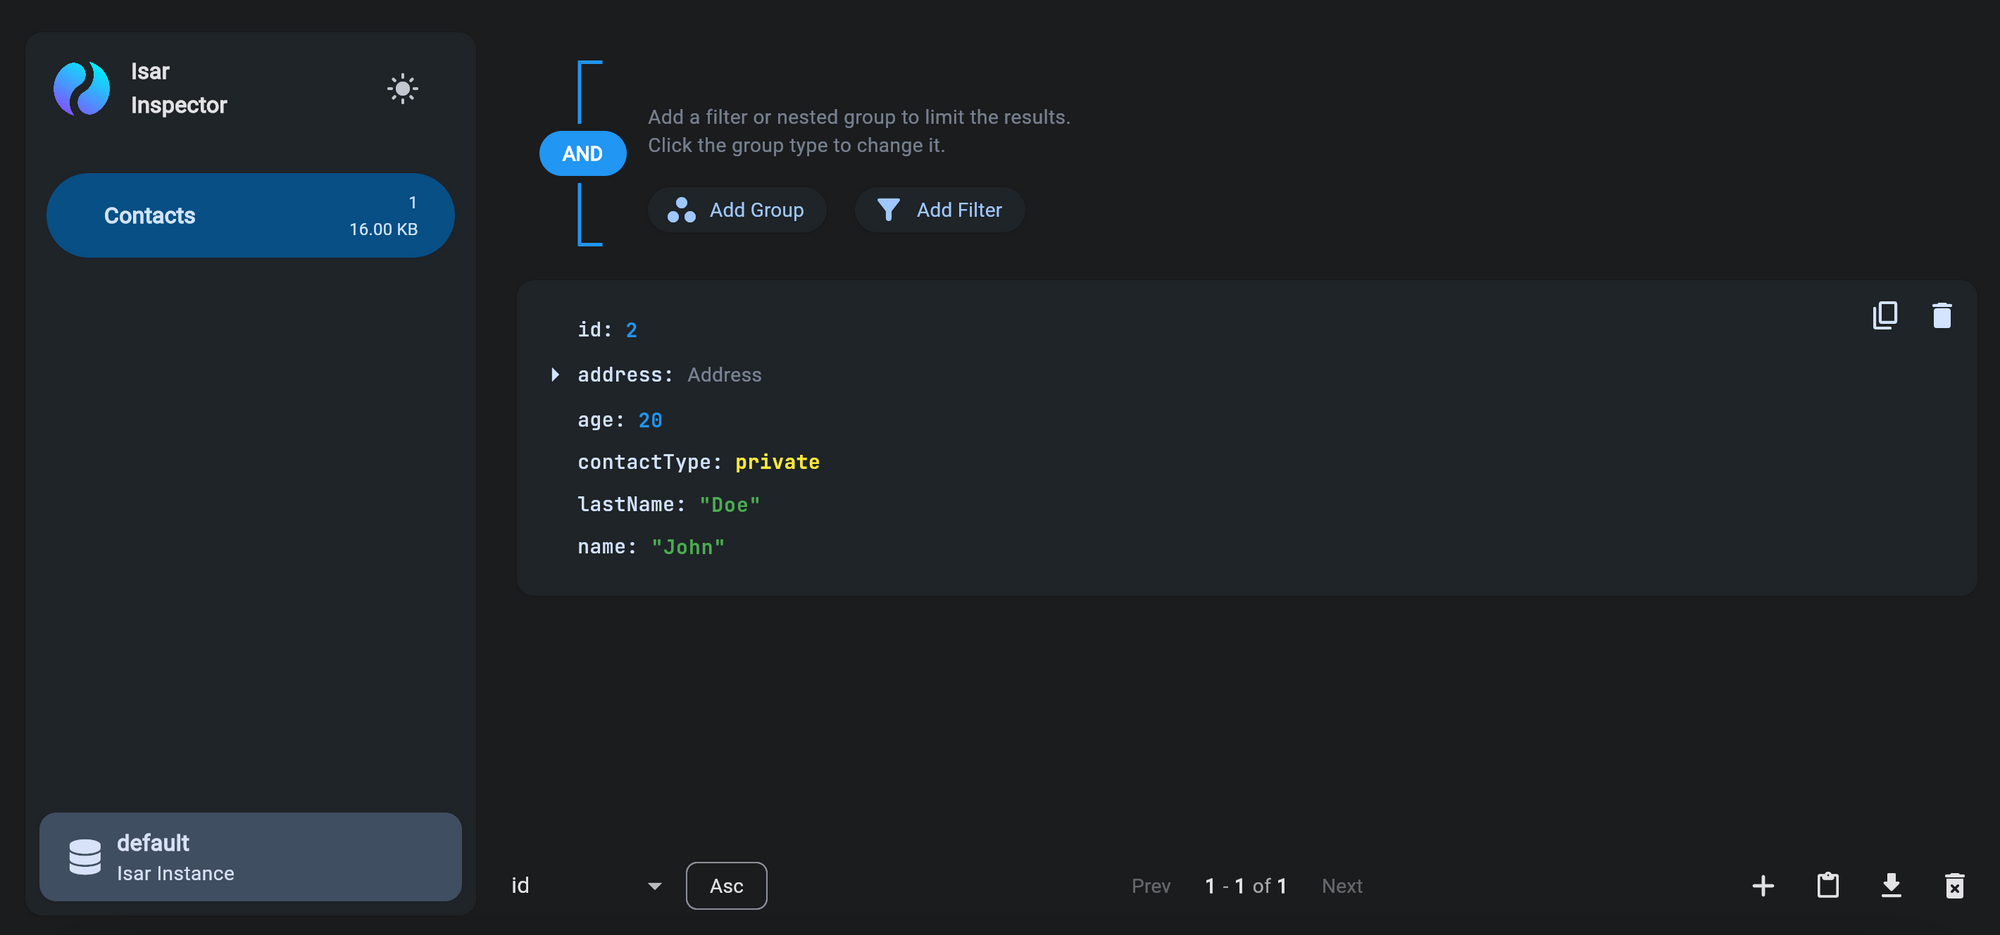
Please note that each time you restart the application, the URL will be different. If you open it in a browser, you should see an interactive inspector:
Queries
Isar's queries are one of the most powerful feature when it comes to find records that match certain condition.
There are two methods of filtering records – Filters and Where clauses.
Filters work by evaluating an expression for every object in the collection being filtered. - Source: https://isar.dev/queries.html
Filter
Filter can be combined with query conditions, logical operators, string conditions etc. Here is the example filter method that contains a few of the operators:
Future<List<Contact>> findBuisnessContactsWithFilter(
      String postCode, String street) async {
    final isar = await db;

    final result = await isar.contacts
        .filter()
        .contactTypeEqualTo(ContactType.buisness)
        .and()
        .address((address) =>
            address.postcodeEqualTo(postCode).and().streetContains(street))
        .findAll();
    return result;
  }
If the filter method finds the objects that met the requirements, it will return then in a list.
Where clauses
On the other side there are Where clauses which works slide differently:
In contrast to filters where clauses use the indexes you defined in the schema to check the query conditions. Querying an index is a lot faster than filtering each record individually. - Source: https://isar.dev/queries.html#where-clauses
To make it work it we need to add @Index annotation to one of the fields e.g:
  @Index()
  @enumerated
  late ContactType contactType;
Then re-run the code generator:
flutter pub run build_runner build
It will create new helper functions depending on the @Index annotation.
With that, we can use the where() clauses.
Future<List<Contact>> findBuisnessContactsWithWhere(
      String postCode, String street) async {
    final isar = await db;

    final result = await isar.contacts
        .where()
        .contactTypeEqualTo(ContactType.buisness)
        .filter()
        .address((address) =>
            address.postcodeEqualTo(postCode).and().streetContains(street))
        .findAll();
    return result;
  }
What is worth to mention, it is possible to combine both where clauses and filters. This makes a performance boost:
The where clause is applied first to reduce the number of objects to be filtered. Then the filter is applied to the remaining objects. Source: https://isar.dev/queries.html#combining-where-clauses-and-filters
Watchers
The another nice feature that Isar provides are – watchers. As the name suggest, it allows making it “watch” for a specific changes in the database. You can subscribe to watch changes on objects, queries and the entire collection, and respond accordingly in the UI.
A watcher is notified after a transaction commits successfully and the target actually changes. Watchers can be lazy and not reload the data or they can be non-lazy and fetch new results in the background. Source: https://pub.dev/packages/isar#database-watchers
Let's look at how to create a watcher that will watch a collection of contacts :
Stream<void> watchContacts() async* {
    final isar = await db;
    yield* isar.contacts.watchLazy();
  }
The watchLazy() methods allow watching whole collection and get notified when any object is added, updated, or delete.
If we want to watch a single object, we can achieve that using watchObject() a method and passing an ID of the object as an argument:
 Stream<Contact?> watchContact(int id) async* {
    final isar = await db;
    yield* isar.contacts.watchObject(id);
  }
You can also use the listen() function from the stream, which returns StreamSubscription - build into Dart, which you can handle like any other in Dart:
Stream<void> userChanged = isar.contacts.watchLazy();
    userChanged.listen(
      (event) {
        // Executed when data event is received
        print('Contact added');
      },
      onError: (err) {
        // Executed when error is received
        print('Error: ${err}');
      },
      cancelOnError:
          false, // The subscription is automatically canceled when the first error event is delivered – default is true
      onDone: () {
        // Executed when done event is recieved
        print('Done!');
      },
    );
Isar v4
What is worth to mention that the new version of ISAR is coming out - ISAR v4.0.0 which brings some breaking changes and enchantments.
Some interesting changes worth to point out are:
- Transactions API changed – all operations will be synchronous by default
- Ids can no longer be
nullable - Where clauses have been removed in favor of automatic index handling
- Isar links have been removed in favor of embedded objects
- String IDs
- Encrypted databases
And many more listed here.
Conclusion:
ISAR deliver powerful and feature-rich local database solution that can be found useful in Flutter applications. The combination of its performance, ease of use, and seamless integration with Flutter makes ISAR a valuable asset for creating high-quality, and data-driven mobile applications.
Source code
You can check out the source code from this article in this repository:
 KrzysztofLen
Thanks for reading ♥️♥️